
15、给代理对象属性设置值
15、给代理对象属性设置值
1、目标
其实本章节要解决的问题就是关于如何给代理对象中的属性填充相应的值,因为在之前把AOP动态代理,融入到Bean的生命周期时,创建代理对象是在整个创建 Bean 对象之前,也就是说这个代理对象的创建并不是在 Bean 生命周期中。
所以本章节中我们要把代理对象的创建融入到 Bean 的生命周期中,也就是需要把创建代理对象的逻辑迁移到 Bean 对象执行初始化方法之后,在执行代理对象的创建。
2、设计
按照创建代理对象的操作 DefaultAdvisorAutoProxyCreator 实现的 InstantiationAwareBeanPostProcessor 接口,那么原本在 Before 中的操作,则需要放到 After 中处理
3、实现
3.1、核心实现类图
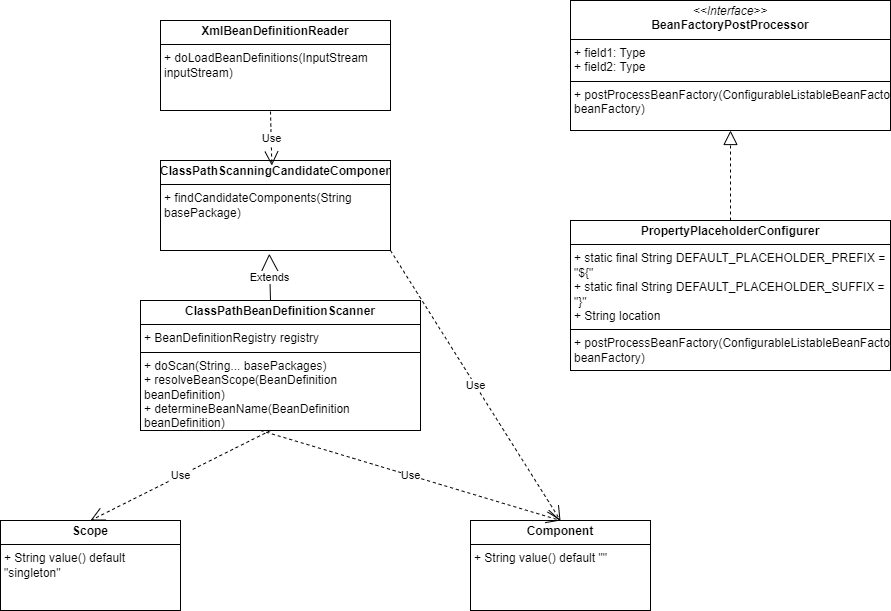
从类结构上看,主要是XmlBeanDefinitionReader类中的doLoadBeanDefinitions方法,在此方法中调用ClassPathScanningCandidateComponentProvider类中的方法逻辑,主要工作是根据包名,自动扫描包中被标注注解的类,然后返回具体的class信息。
因此就可以在加载阶段,自动实现根据包名扫描包路径下所有的类,将标注注解的class注册到容器中。
PropertyPlaceholderConfigurer 目前看上去像一块单独的内容,后续会把这块的内容与自动加载 Bean 对象进行整合,也就是可以在注解上使用占位符配置一些在配置文件里的属性信息,此类实现BeanFactoryPostProcessor接口,因为BeanFactoryPostProcessor可以在加载完成BeanDefinition后对定义进行修改,所以加载配置文件中的属性就需要再注册完成定义后,进行填充。
3.2、判断CGlib对象
public class TargetSource {

    /**
     * Return the type of targets returned by this {@link TargetSource}.
     * <p>Can return <code>null</code>, although certain usages of a
     * <code>TargetSource</code> might just work with a predetermined
     * target class.
     *
     * @return the type of targets returned by this {@link TargetSource}
     */
    public Class<?>[] getTargetClass() {
        Class<?> clazz = this.target.getClass();
        clazz = ClassUtils.isCglibProxyClass(clazz) ? clazz.getSuperclass() : clazz;
        return clazz.getInterfaces();
    }
}
在 TargetSource#getTargetClass 是用于获取 target 对象的接口信息的,那么这个 target 可能是 JDK代理 创建也可能是 CGlib创建,为了保证都能正确的获取到结果,这里需要增加判读 ClassUtils.isCglibProxyClass(clazz
3.3、迁移创建AOP代理方法
public class DefaultAdvisorAutoProxyCreator implements InstantiationAwareBeanPostProcessor, BeanFactoryAware {

    @Override
    public Object postProcessAfterInitialization(Object bean, String beanName) throws BeansException {

        if (isInfrastructureClass(bean.getClass())) return bean;

        Collection<AspectJExpressionPointcutAdvisor> advisors = beanFactory.getBeansOfType(AspectJExpressionPointcutAdvisor.class).values();

        for (AspectJExpressionPointcutAdvisor advisor : advisors) {
            ClassFilter classFilter = advisor.getPointcut().getClassFilter();
            // 过滤匹配类
            if (!classFilter.matches(bean.getClass())) continue;

            AdvisedSupport advisedSupport = new AdvisedSupport();

            TargetSource targetSource = new TargetSource(bean);
            advisedSupport.setTargetSource(targetSource);
            advisedSupport.setMethodInterceptor((MethodInterceptor) advisor.getAdvice());
            advisedSupport.setMethodMatcher(advisor.getPointcut().getMethodMatcher());
            advisedSupport.setProxyTargetClass(false);

            // 返回代理对象
            return new ProxyFactory(advisedSupport).getProxy();
        }

        return bean;
    }

}
关于 DefaultAdvisorAutoProxyCreator 类的操作主要就是把创建 AOP 代理的操作从 postProcessBeforeInstantiation 移动到 postProcessAfterInitialization 中去。
通过设置一些 AOP 的必备参数后,返回代理对象 new ProxyFactory(advisedSupport).getProxy() 这个代理对象中就包括间接调用了 TargetSource 中对 getTargetClass() 的获取。
3.4、在Bean的生命周期中初始化执行
public abstract class AbstractAutowireCapableBeanFactory extends AbstractBeanFactory implements AutowireCapableBeanFactory {

    /**
     * 带参数的创建bean对象
     * @param beanName
     * @param beanDefinition
     * @param args
     * @return
     * @throws BeansException
     */
    @Override
    protected Object createBean(String beanName, BeanDefinition beanDefinition, Object[] args) throws BeansException {
        Object bean = null;
        try {

            // 执行 Bean 的初始化方法和 BeanPostProcessor 的前置和后置处理方法
            bean = initializeBean(beanName, bean, beanDefinition);
        } catch (Exception e) {
            throw new BeansException("Instantiation of bean failed", e);
        }

        // 注册实现了 DisposableBean 接口的 Bean 对象
        registerDisposableBeanIfNecessary(beanName, bean, beanDefinition);

        // 判断 SCOPE_SINGLETON、SCOPE_PROTOTYPE
        if (beanDefinition.isSingleton()) {
            registerSingleton(beanName, bean);
        }
        return bean;
    }


    /**
     * 前置处理器执行完成后才会执行init()初始化方法
     * 执行bean的初始化方法,前置 后置处理器方法
     * @param beanName
     * @param bean
     * @param beanDefinition
     * @return
     */
    private Object initializeBean(String beanName, Object bean, BeanDefinition beanDefinition) {

        // invokeAwareMethods 引用Aware接口
        if (bean instanceof Aware) {
//            感知BeanFactory
            if (bean instanceof BeanFactoryAware) {
                ((BeanFactoryAware) bean).setBeanFactory(this);
            }
            if (bean instanceof BeanClassLoaderAware){
                ((BeanClassLoaderAware) bean).setBeanClassLoader(getBeanClassLoader());
            }
            if (bean instanceof BeanNameAware) {
                ((BeanNameAware) bean).setBeanName(beanName);
            }
        }


        // 1. 执行 BeanPostProcessor Before 处理
        Object wrappedBean = applyBeanPostProcessorsBeforeInitialization(bean, beanName);

        // 待完成内容:invokeInitMethods(beanName, wrappedBean, beanDefinition);
        // 执行 Bean 对象的初始化方法
        try {
            invokeInitMethods(beanName, wrappedBean, beanDefinition);
        } catch (Exception e) {
            throw new BeansException("Invocation of init method of bean[" + beanName + "] failed", e);
        }
        // 2. 执行 BeanPostProcessor After 处理
        wrappedBean = applyBeanPostProcessorsAfterInitialization(wrappedBean, beanName);
        return wrappedBean;
    }

    @Override
    public Object applyBeanPostProcessorsBeforeInitialization(Object existingBean, String beanName) throws BeansException {
        Object result = existingBean;
        for (BeanPostProcessor processor : getBeanPostProcessors()) {
            Object current = processor.postProcessBeforeInitialization(result, beanName);
            if (null == current) return result;
            result = current;
        }
        return result;
    }
}
4、测试
4.1、测试用例
Service对象
@Component("userService")
public class UserService implements IUserService {

    private String token;

    public String queryUserInfo() {
        try {
            Thread.sleep(new Random(1).nextInt(100));
        } catch (InterruptedException e) {
            e.printStackTrace();
        }
        return "bugcode,100001,深圳";
    }

    public String register(String userName) {
        try {
            Thread.sleep(new Random(1).nextInt(100));
        } catch (InterruptedException e) {
            e.printStackTrace();
        }
        return "注册用户:" + userName + " success!";
    }
}
实现Service对象,并且在Service中使用了Component进行标注,另外在类中定义tocken属性,xml在加载的时候,会自动读取配置文件中的配置注册。
属性配置
# Config File
system.key=OLpj9823dZ
xml配置文件
spring-property.xml
<?xml version="1.0" encoding="UTF-8"?>
<beans xmlns="http://www.springframework.org/schema/beans"
       xmlns:xsi="http://www.w3.org/2001/XMLSchema-instance"
       xmlns:context="http://www.springframework.org/schema/context"
       xsi:schemaLocation="http://www.springframework.org/schema/beans
	         http://www.springframework.org/schema/beans/spring-beans.xsd
		 http://www.springframework.org/schema/context">

    <bean class="bugcode.online.springframework.beans.factory.PropertyPlaceholderConfigurer">
        <property name="location" value="classpath:token.properties"/>
    </bean>

    <bean id="userService" class="bugcode.online.springframework.bean.UserService">
        <property name="token" value="${token}"/>
    </bean>

</beans>
加载 classpath:token.properties 设置占位符属性值 ${token}
xml文件配置
<?xml version="1.0" encoding="UTF-8"?>
<beans>


    <bean id="userService" class="bugcode.online.springframework.bean.UserService"/>

    <bean class="bugcode.online.springframework.aop.framework.autoProxy.DefaultAdvisorAutoProxyCreator"/>

    <bean id="beforeAdvice" class="bugcode.online.springframework.bean.UserServiceBeforeAdvice"/>

    <bean id="methodInterceptor" class="bugcode.online.springframework.aop.framework.adapter.MethodBeforeAdviceInterceptor">
        <property name="advice" ref="beforeAdvice"/>
    </bean>

    <bean id="pointcutAdvisor" class="bugcode.online.springframework.aop.aspectj.AspectJExpressionPointcutAdvisor">
        <property name="expression" value="execution(* bugcode.online.springframework.bean.IUserService.*(..))"/>
        <property name="advice" ref="methodInterceptor"/>
    </bean>
</beans>
在配置中,首先将Service,beforeAdvice,methodInterceptor对象交给spring容器管理,然后就可以在切面表达式中对service中的对象进行拦截扩展。
spring-scan.xml
<?xml version="1.0" encoding="UTF-8"?>
<beans xmlns="http://www.springframework.org/schema/beans"
       xmlns:xsi="http://www.w3.org/2001/XMLSchema-instance"
       xmlns:context="http://www.springframework.org/schema/context"
       xsi:schemaLocation="http://www.springframework.org/schema/beans
	         http://www.springframework.org/schema/beans/spring-beans.xsd
		 http://www.springframework.org/schema/context">

    <context:component-scan base-package="bugcode.online.springframework.bean"/>

</beans>
添加 component-scan 属性,设置包扫描根路径
4.2、测试结果
测试占位符
@Test
    public void test_scan() {
        ClassPathXmlApplicationContext applicationContext = new ClassPathXmlApplicationContext("classpath:spring-scan.xml");
        IUserService userService = applicationContext.getBean("userService", IUserService.class);
        System.out.println("测试结果:" + userService.queryUserInfo());
    }
结果
测试结果:UserService#token = { RejDlI78hu223Opo983Ds }

Process finished with exit code 0
测试包扫描
    @Test
    public void test_scan_1() {
        ClassPathXmlApplicationContext applicationContext = new ClassPathXmlApplicationContext("classpath:spring-scan.xml");
        IUserService userService = applicationContext.getBean("userService", IUserService.class);
        System.out.println("测试结果:" + userService.queryUserInfo());
    }
测试结果
测试结果:bugcode,100001,深圳

Process finished with exit code 0
5、小结
通过对之前Bean生命周期的理解,可以发现现在给Spring容器添加功能已经很容易了,第一步只需要定义出某个功能,第二部是将功能串联到bean的生命周期中即可。
比如本章中自定义的注解扫描,需要定义出自动扫描包下标注注解的类,然后将此类注册到容器中,因此首先将功能组件开发出来,接着将功能集成到xml文件读取加载中即可。
所以在学习spring过程中,spring本身是帮我我们管理Bean对象,所以一切都围绕着bean的生命周期在开发,因此需要深刻理解一下bean对象的生命周期,以后在扩展功能的时候就很方便扩展到生命周期的某一个阶段。